How to configure Instagram (Stand-alone and Business) for OpenQuok
Connect your agent today
Draft from chat, review in your calendar, and publish only what you approve.
Overview
You can connect a professional Instagram account in two ways:
- Instagram (Business) — Facebook Login for Business; requires a Facebook Page linked to that Instagram account.
- Instagram (Standalone) — Instagram Login directly; no Facebook Page required.
Both require a Meta for Developers app. The sections below are OpenQuok-specific URLs and environment variables.
One Instagram account, one connection path
OpenQuok allows one connected channel per Instagram account per workspace. Pick Instagram (Business) or Instagram (Standalone) for each @handle — not both.
Warning
If Instagram (Standalone) is already connected, OpenQuok rejects adding Instagram (Business) for the same @handle. Disconnect the existing channel on Home first, then connect.
Prerequisites (Instagram + Meta)
Before you connect Instagram (Business) in OpenQuok:
- Your Instagram account is Professional (Business or Creator), not personal.
- A Facebook Page you publish from.
- Both the Page and the Instagram account are in your Meta business portfolio.
- The Instagram account is linked to that Page (not only added to the portfolio).
Note
Add the accounts to your business portfolio
In Meta Business Suite → Settings → Accounts → Instagram accounts → + Add:
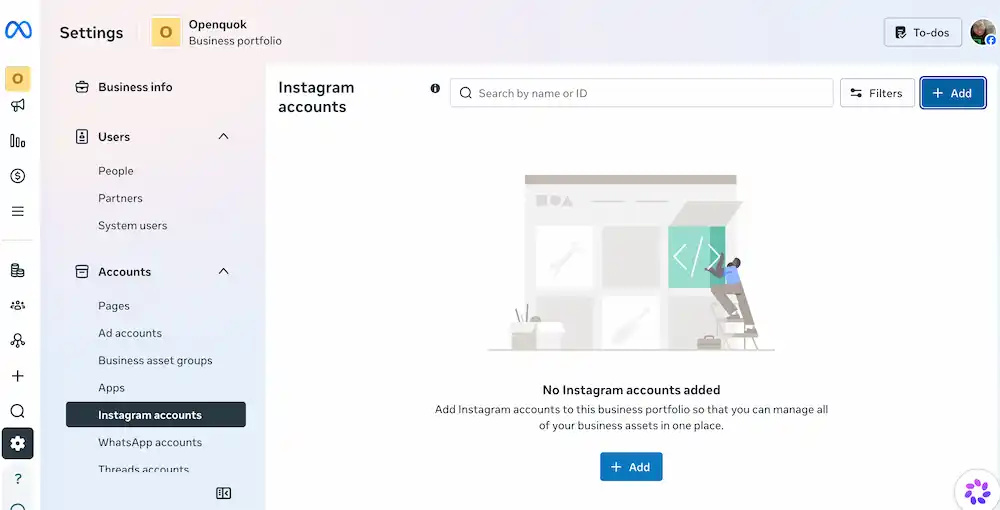
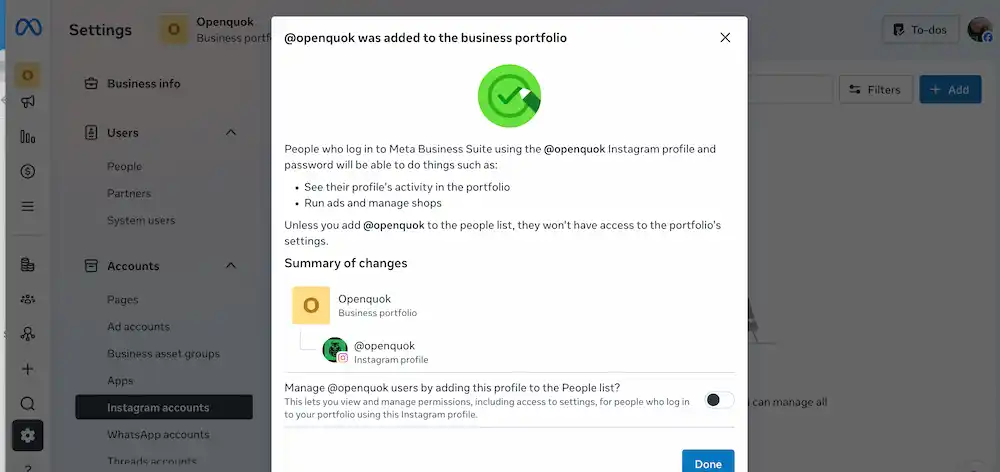
When this step succeeds, Meta confirms the account was added to the portfolio (for example, @openquok was added to the business portfolio):
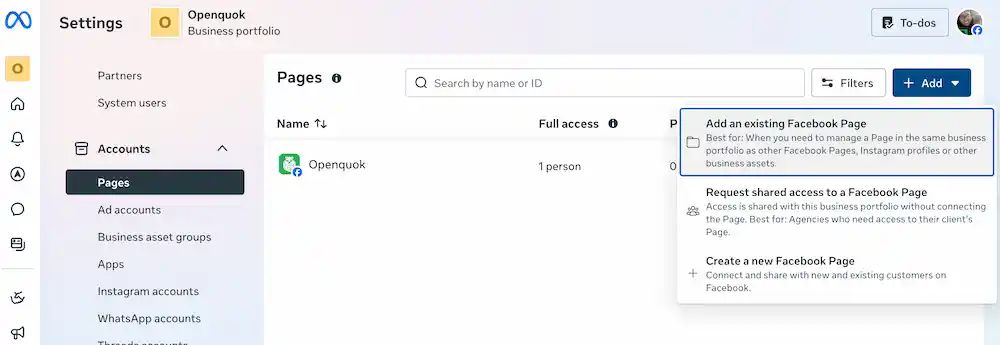
Do not forget to also add a Facebook page to Meta Business Suite → Settings → Accounts → Pagess -> + Add:
Add a Facebook Page and Link it to the Instagram account
In Meta Business Suite → Settings → Accounts → Pagess → + Add:
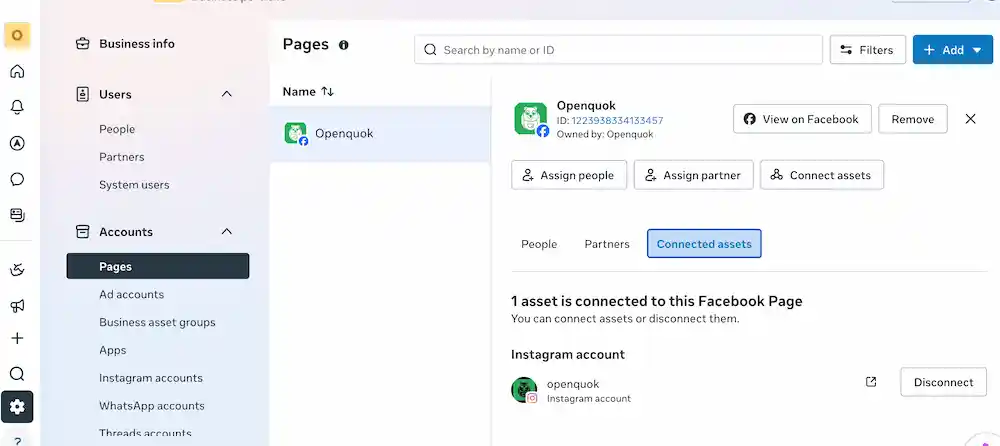
Then, connect the same professional instagram account to the Page you publish from: → Settings → Accounts → Pagess → Click your page -> Connect Asset:
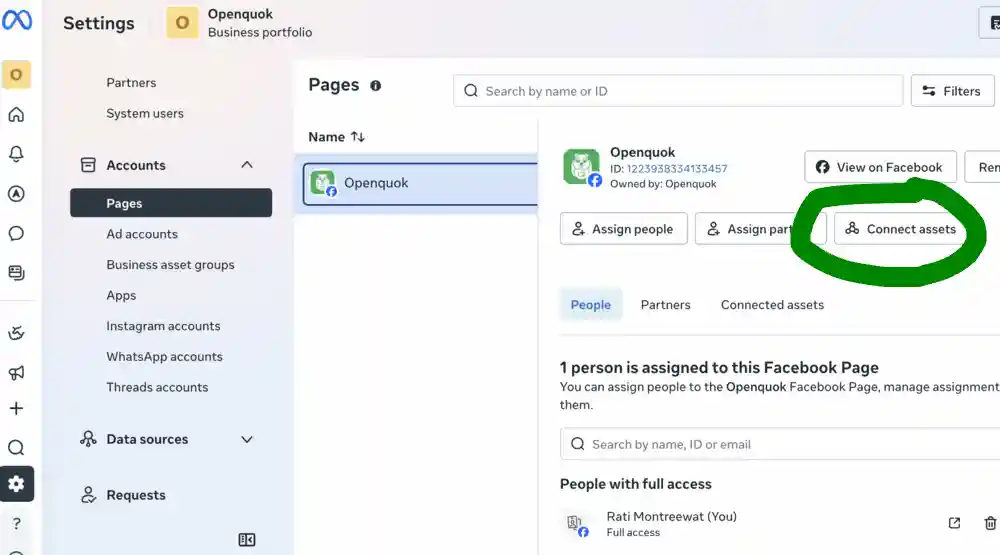
After this step, the Page should show the connected Instagram handle in Connected Assets.
Alternatiely, you may either:
Facebook Page → Settings → Linked accounts → Instagram → connect the account. or
Instagram app → Settings and activity → Account type and tools → Connect to Facebook Page → choose your Page, or
Re-authorize Page during connect in Openquok Dashboard
When OpenQuok redirects you to Meta, click Edit settings (not Continue with previous settings) so Meta includes the Page and its linked Instagram account.
Select your Facebook Page and finish consent. OpenQuok then lists business instagram accounts.
Note
Features
Both Instagram (Business) and Instagram (Standalone) use the same Content Publishing pipeline.
Supported
| Feature | Details |
|---|---|
| Feed image post | At least one attachment required when scheduling |
| Carousel | 2–10 images and/or videos; one caption for the whole post |
| Reel | Single .mp4 attachment is published as a Reel (max 180 seconds) |
| Story | Set post type to Story; one attachment (max 60 seconds for video) |
| Trial Reel | Optional trial audience before full publish; graduation Manual or Auto (performance) |
| Collaborators | Up to 3 public usernames on feed/Reel posts with single media |
| Text follow-up comments | Schedule comment replies after the main post (text-only on Instagram) |
Media routing is automatic: one video → Reel, multiple attachments on a feed post → carousel, post_type: story → Story surface.
Not supported
| Feature | Notes |
|---|---|
| Story link stickers | Meta sticker APIs are not wired in OpenQuok |
| Automatic comment auto-reply | No inbox automation or keyword replies |
| Collaborators on carousel | Validation rejects collaborator tags when more than one attachment is attached |
| Media on follow-up comments | Thread reply rows are caption-only for Instagram |
CLI walkthroughs: CLI Examples — Instagram.
Backend environment
OpenQuok reads credentials only through backend/config/GlobalConfig.ts. Set:
Instagram (Business) — Facebook Login
- FACEBOOK_APP_ID
- FACEBOOK_APP_SECRET
Instagram (Standalone) — Instagram Login
- INSTAGRAM_APP_ID
- INSTAGRAM_APP_SECRET
Copy from backend/.env.development.example into backend/.env.development.local, then restart the backend.
The frontend base URL used in OAuth redirect URIs comes from FRONTEND_DOMAIN_URL (default http://localhost:5173 for local Vite).
For non-HTTPS local URLs, the backend uses the same HTTPS relay pattern as other Meta integrations (see the Threads doc).
OAuth redirect URIs
Meta redirects the browser to your web app after consent. Register these exact paths on top of your frontend origin (from FRONTEND_DOMAIN_URL), for example:
Instagram (Business) — Facebook Login for Business
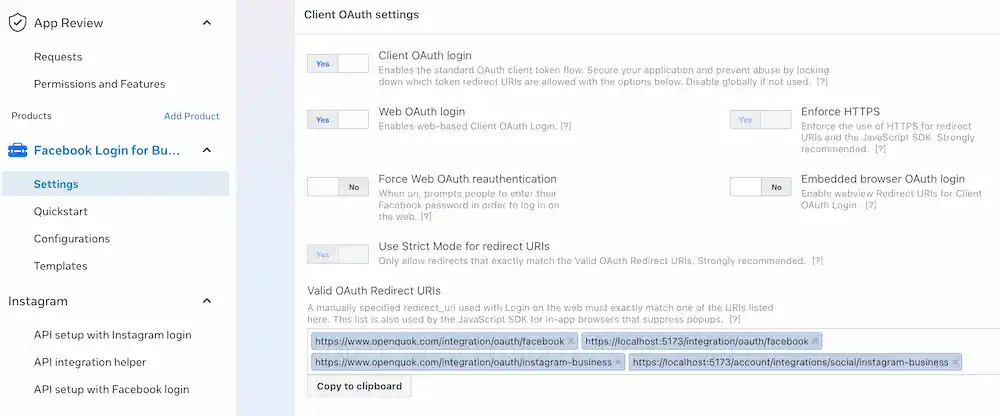
https://YOUR-FRONTEND-DOMAIN/integration/oauth/instagram-businessInstagram (Standalone) — Instagram Login
https://YOUR-FRONTEND-DOMAIN/integration/oauth/instagram-standaloneNote
Substitute the hostname from FRONTEND_DOMAIN_URL (scheme + host, no trailing slash). www and apex are different—register in Meta the same origin the API sends in redirect_uri. Align with Configuration - Backend and Vite (SvelteKit).
For local HTTPS (or relay) examples, mirror the pattern used for Threads in Meta Threads.
Meta app setup (summary)
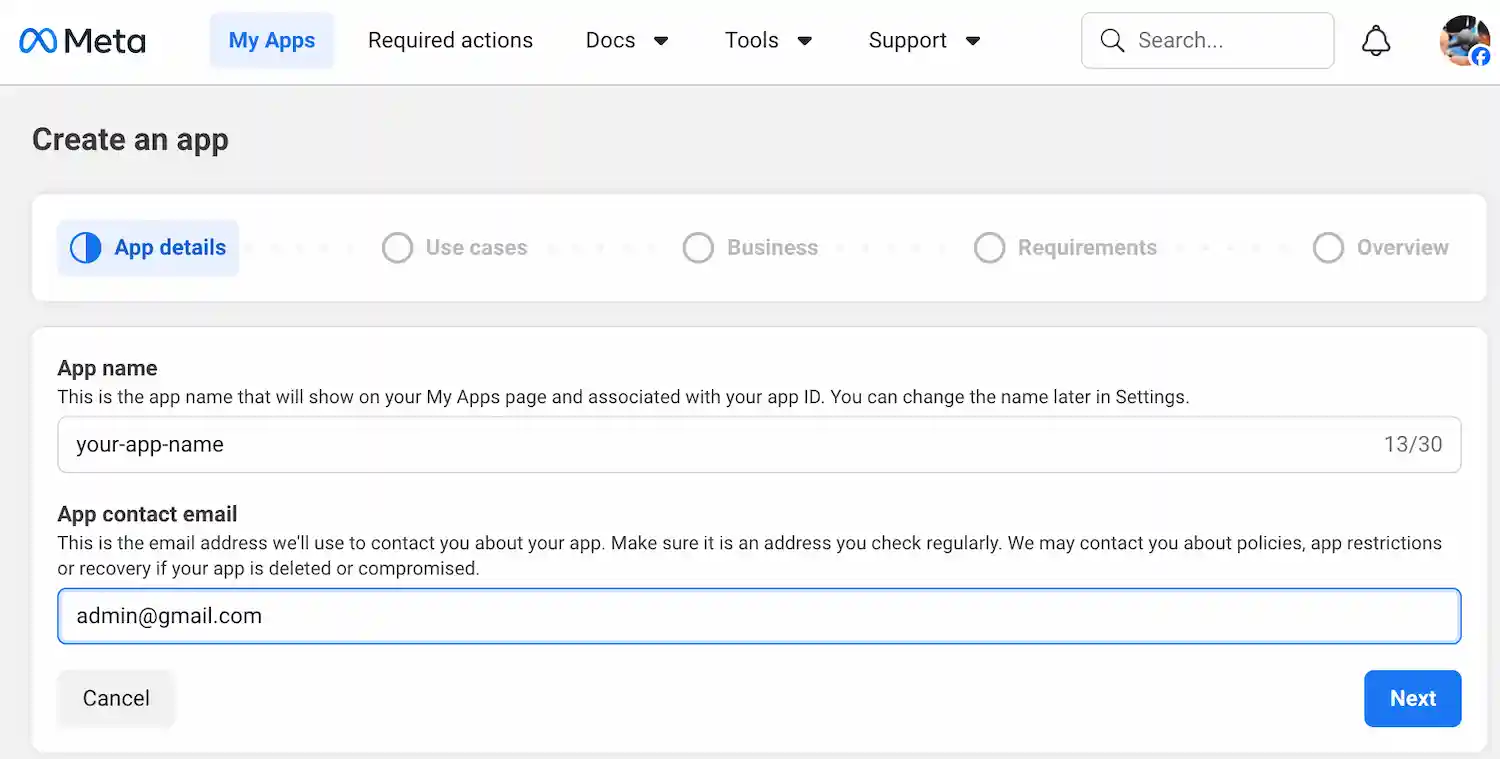
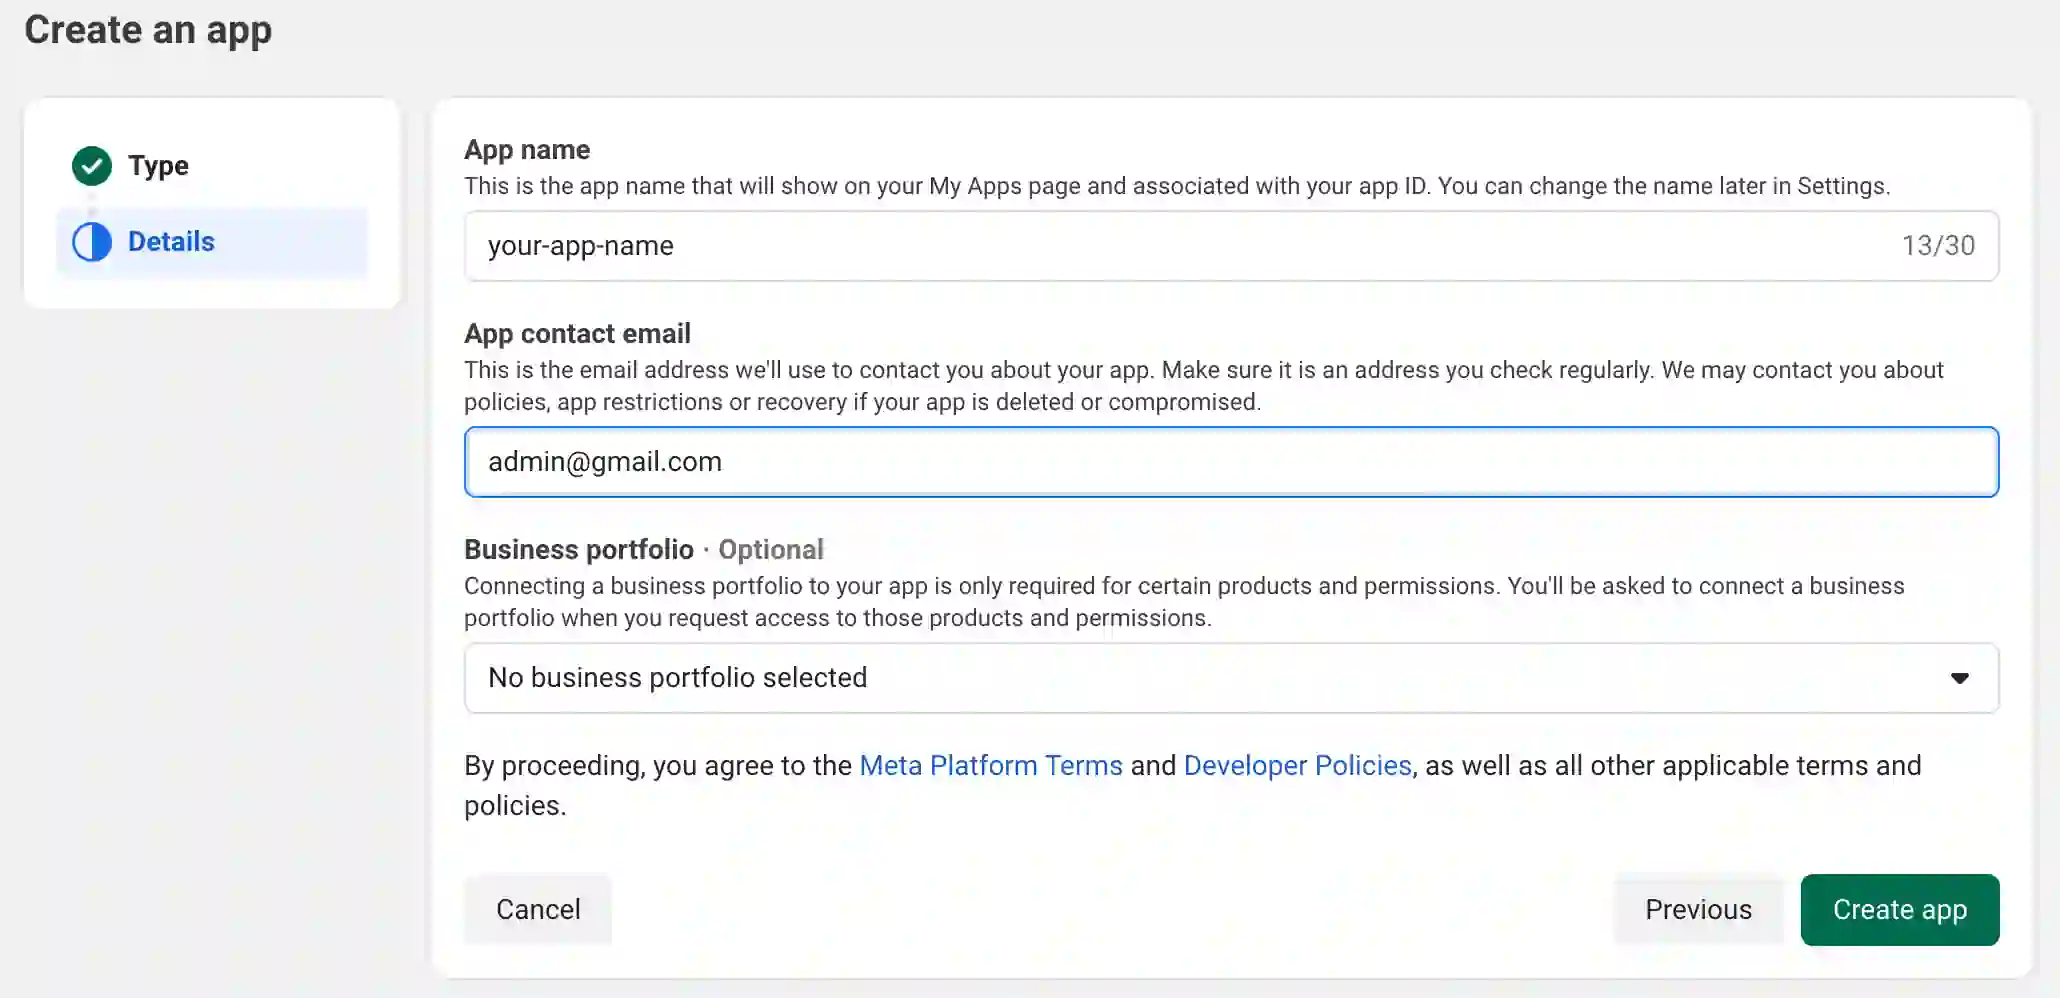
Create a Meta app
Create an app in Meta for Developers.
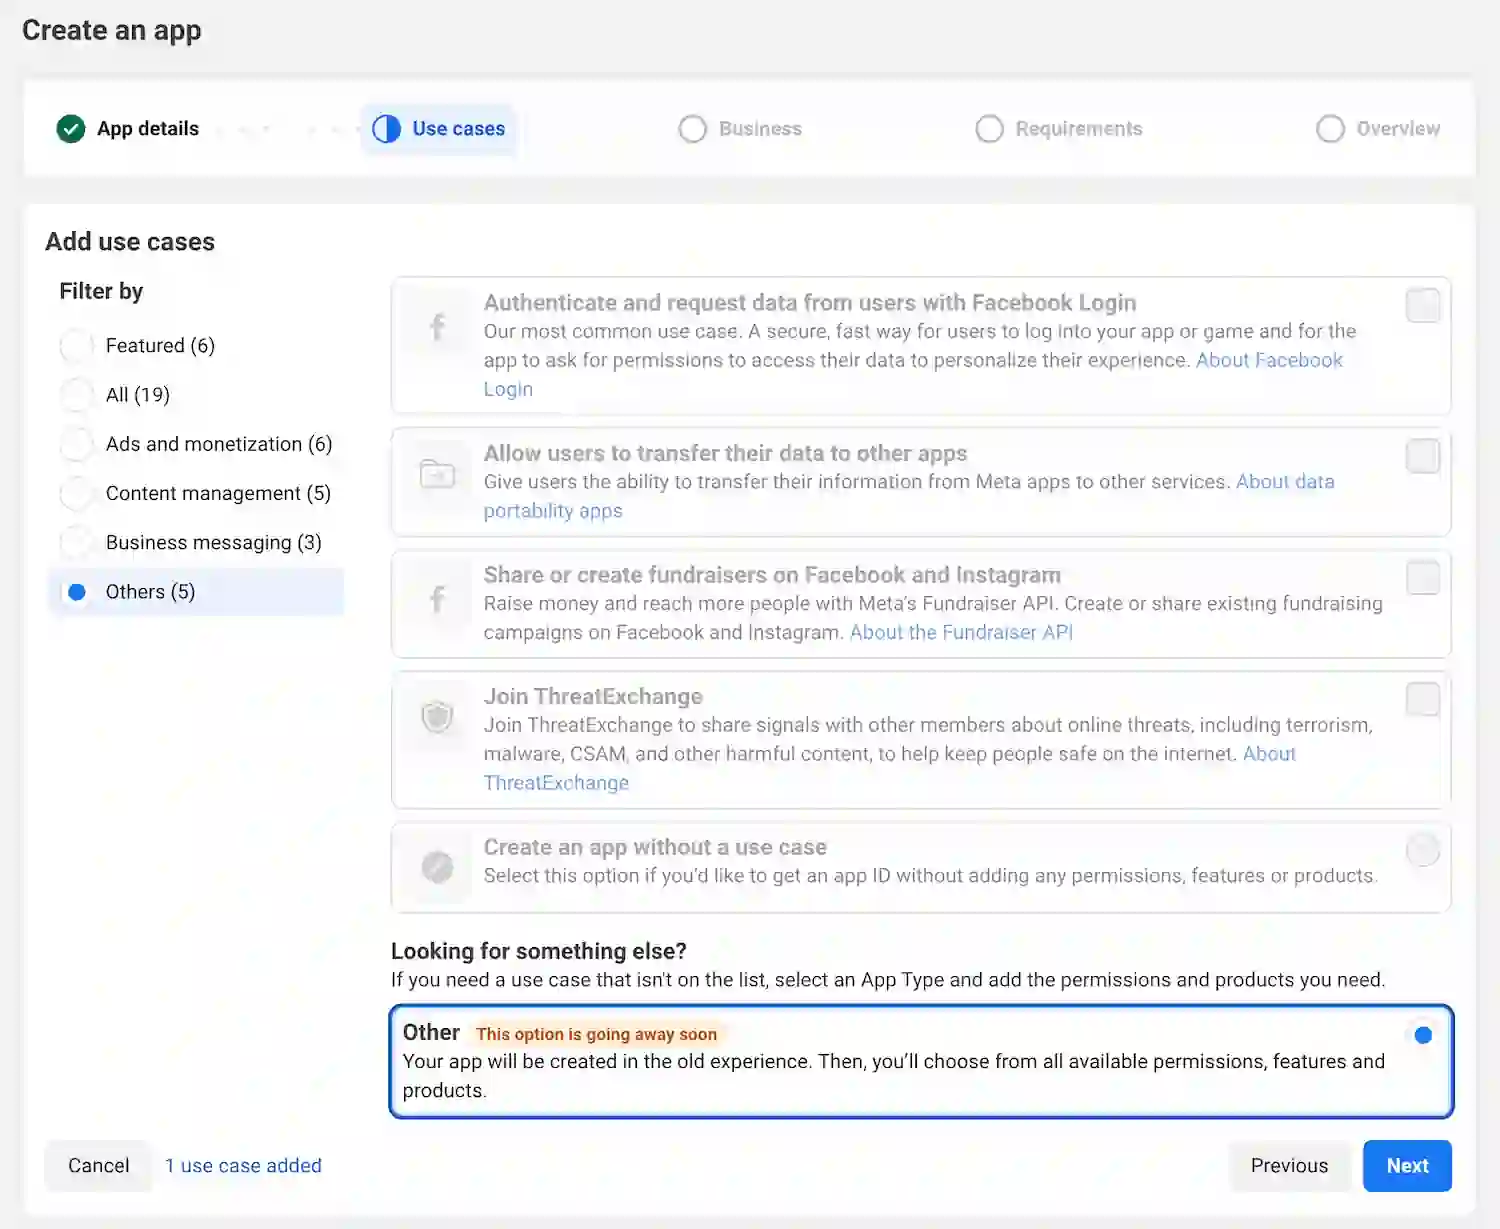
Select use case
Select Other.
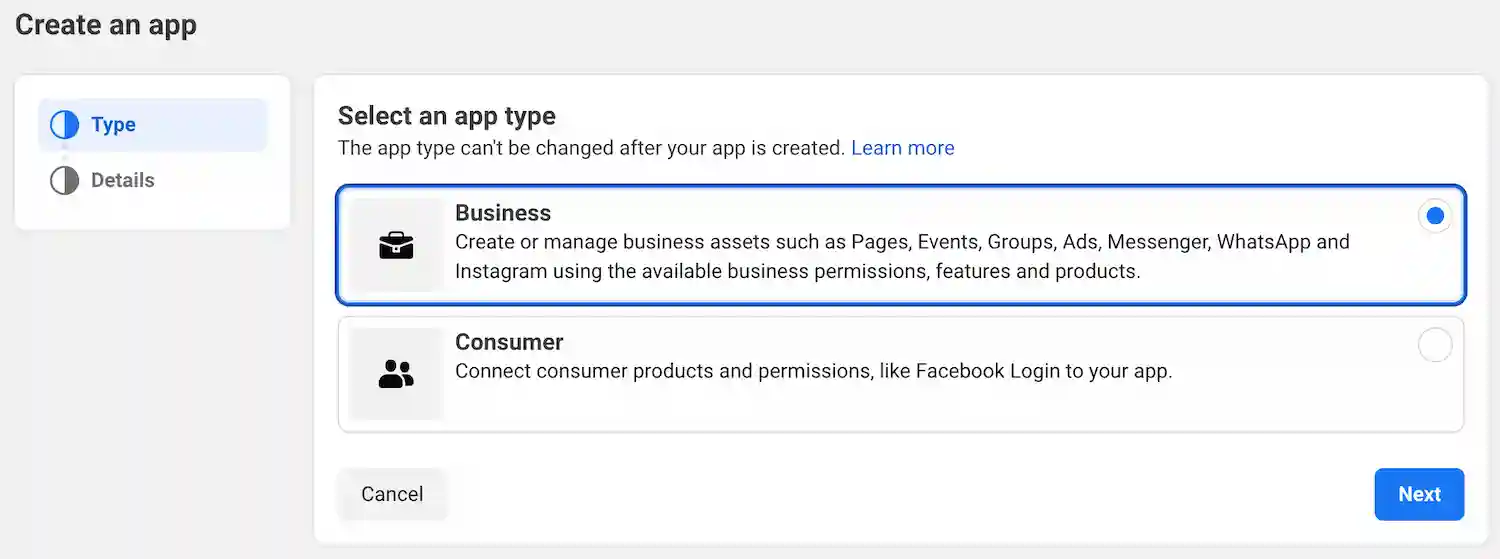
Select app type
Select Business.
Finish Creating Meta App
Warning
Instagram (Business) flow
When your professional Instagram account is already tied to a Facebook Page, you can connect to it by setting up the Login for Business flow.
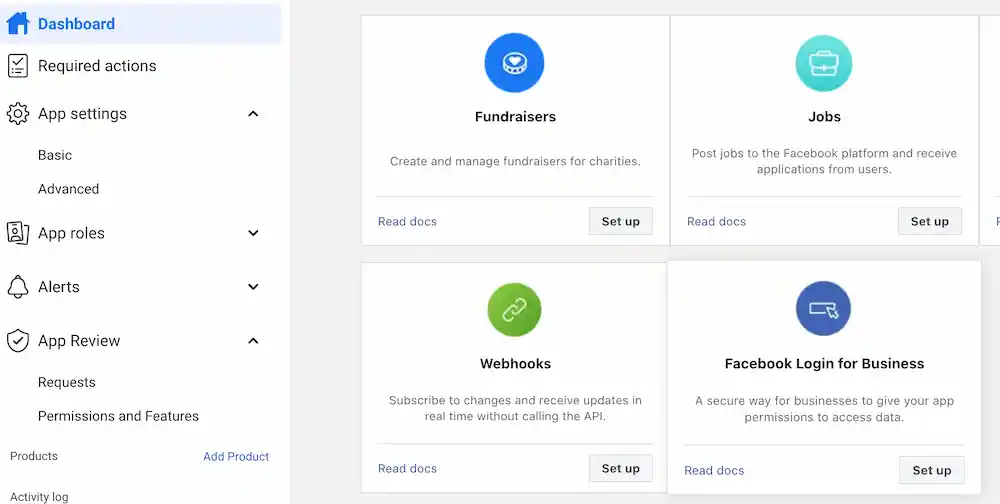
Add Facebook Login for Business
In dashboard, select Facebook Login for Business
Set Redirect URI
Add the Instagram (Business) redirect URI from the OAuth redirect URIs (register in Meta) section to your app’s valid OAuth redirect list.
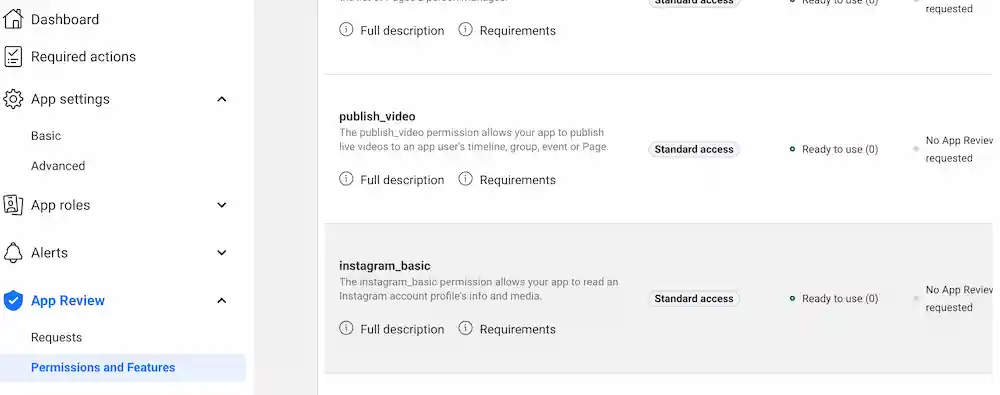
Request permissions
In the Meta developer app, open the permissions area where you can request advanced access (wording varies—for example Use cases → Permissions and features, or App Review). Request access for the scopes below; they match what OpenQuok’s Instagram (Business) integration asks for during OAuth.
- instagram_basic
- pages_show_list
- pages_read_engagement
- business_management
- instagram_content_publish
- instagram_manage_comments
- instagram_manage_insights
Note
Copy your credentials
In the Meta app Settings area, copy App ID → FACEBOOK_APP_ID, and App Secret → FACEBOOK_APP_SECRET to your env file.

Restart the backend. Otherwise, the backend may not pick up your new environment variables.
Instagram (Standalone) flow
Use Instagram (Standalone) when you prefer Instagram Login for a professional account and do not want to route the connection through a Facebook Page or Facebook Login for Business.
Warning
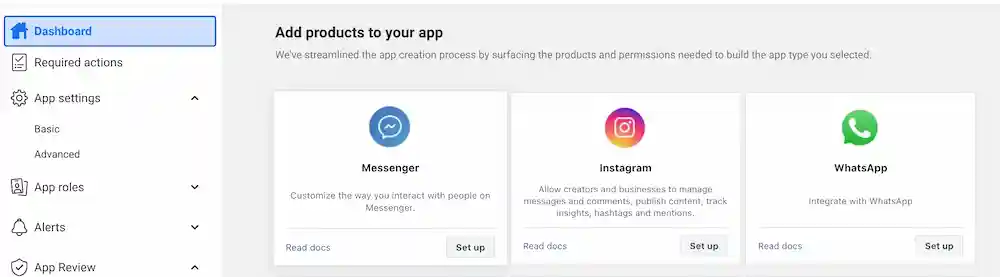
Add Instagram product
In dashboard, select Instagram
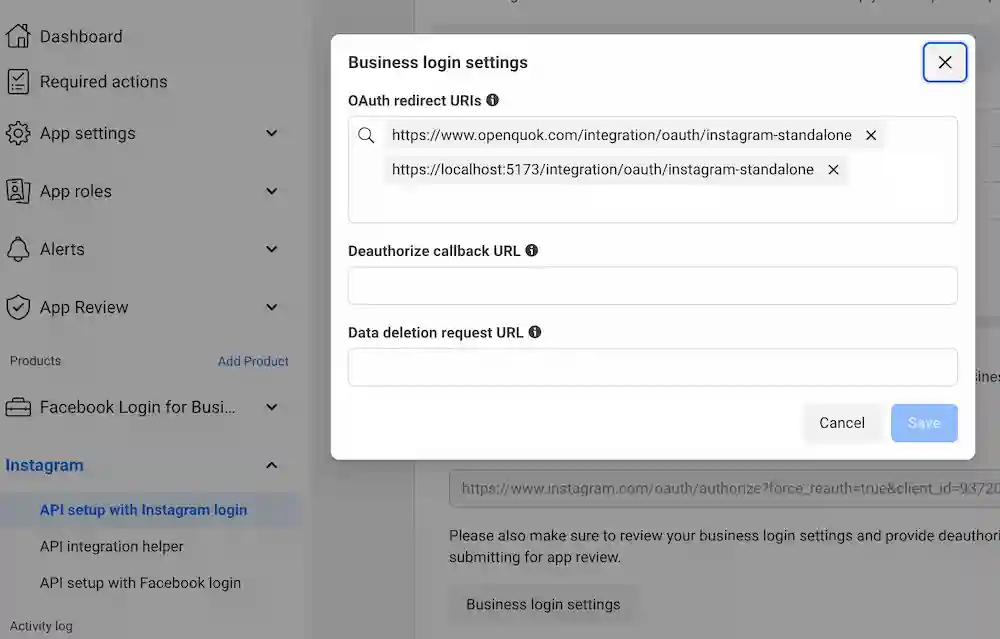
Set Instagram Business Login

This will let you to provide a redirect URL.
Set Redirect URI
Add the Instagram (Standalone) redirect URI from the OAuth redirect URIs (register in Meta) section to your app’s valid OAuth redirect list.
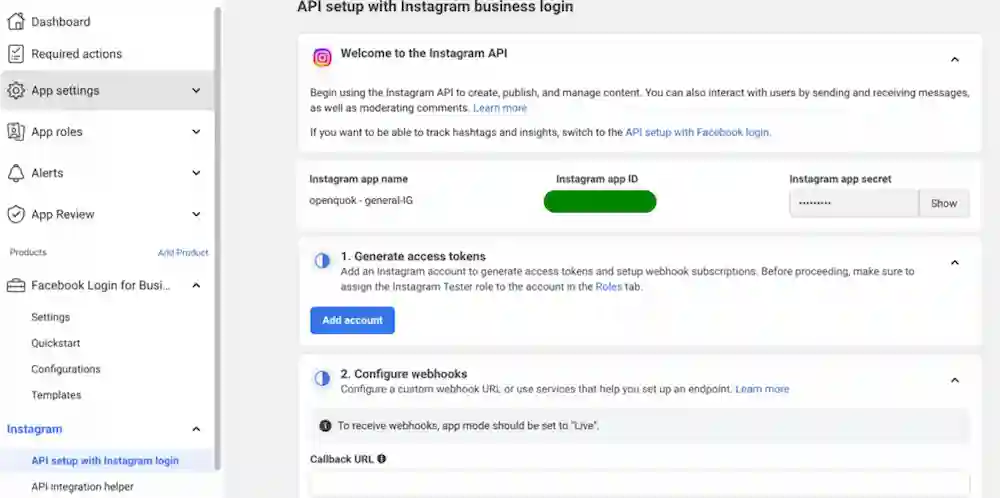
Copy your credentials
Copy Instagram app ID → INSTAGRAM_APP_ID, and Instagram app secret → INSTAGRAM_APP_SECRET to your env file.
Restart the backend. Otherwise, the backend may not pick up your new environment variables.
Add Role and Start testing
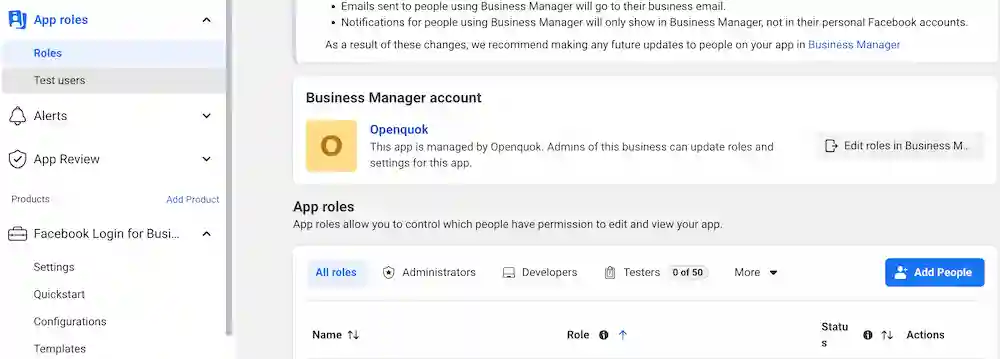
Add People
Go to App Roles page and click “Add People”
Add the Instagram account as Tester
Under additional roles for this app, select Instagram Tester.
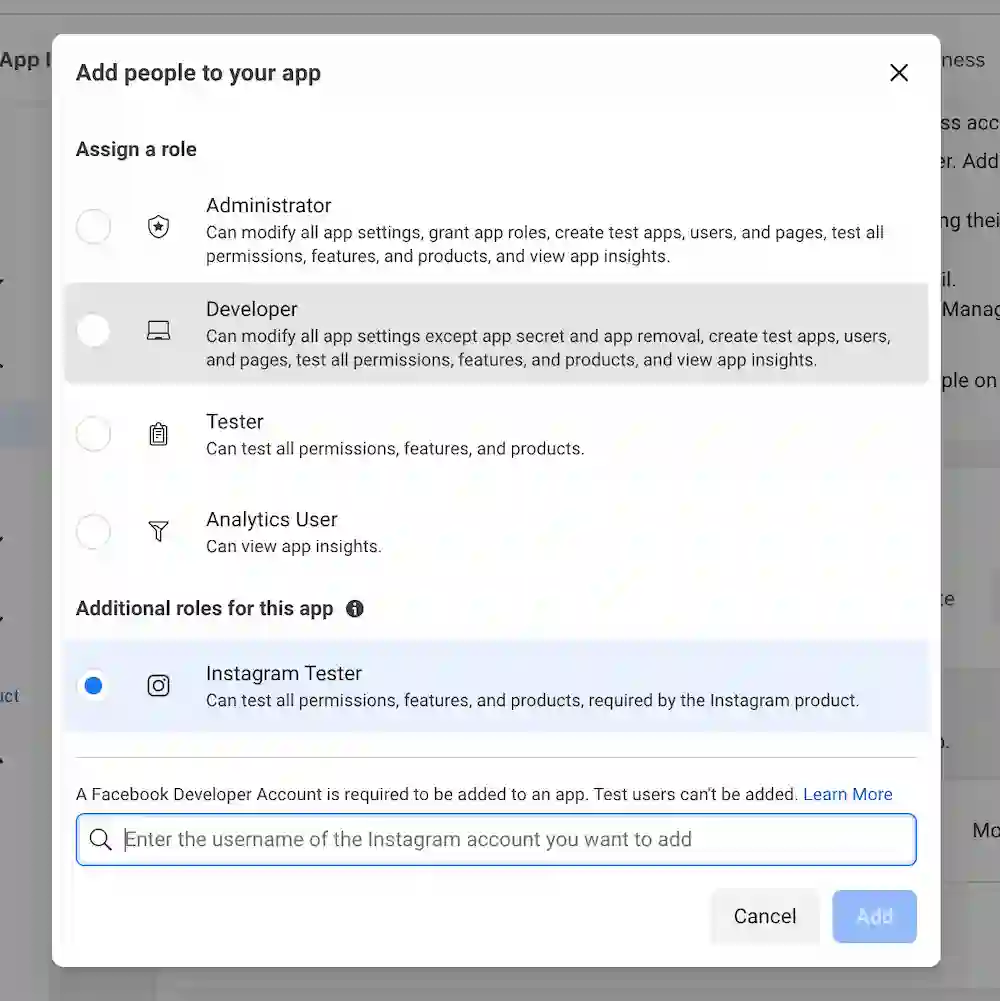
Enter the Instagram username that should test the app (often your own).
Accept Invitation
You should see a pending invite on Instagram’s manage access page.
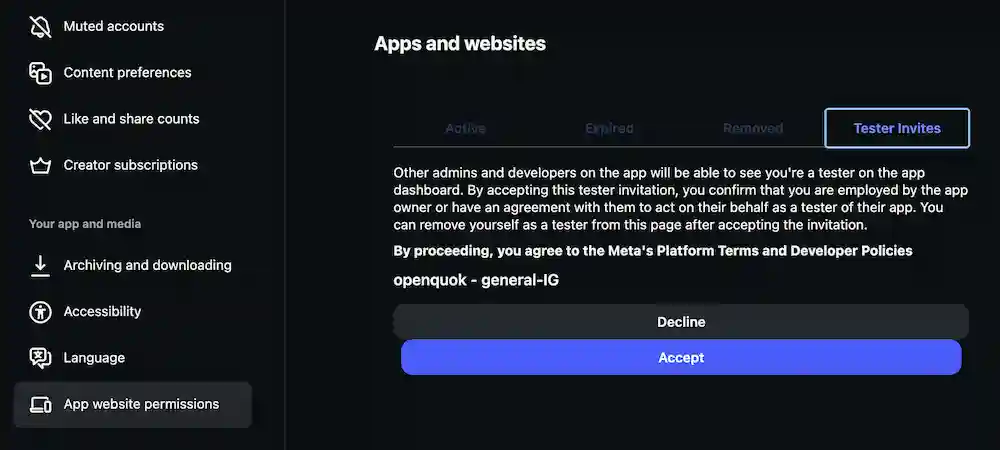
Accept it to finish tester setup for that account.