CLI authentication
Setup OAuth2 authentication for OpenQuok CLI.
Connect your agent today
Draft from chat, review in your calendar, and publish only what you approve.
Overview
The OpenQuok CLI authenticates to the programmatic API in one of two ways. Both yield a Bearer token with the opo_ prefix:
- OAuth2 device flow (recommended) — No client ID or secret in the CLI; a small CLI auth server holds the OAuth client secret and completes the flow.
- Programmatic access token — set OPENQUOK_API_KEY to an opo_ token from the dashboard for scripts and CI.
If both are present, stored OAuth2 credentials take priority over OPENQUOK_API_KEY — run openquok auth:logout to clear them if you want the env var to be used.
OAuth2 (device flow)
Open the sign-in link on your phone or computer, sign in to OpenQuok if needed, choose a workspace, and tap Authorize. Credentials are stored for later commands (default ~/.openquok/credentials.json).
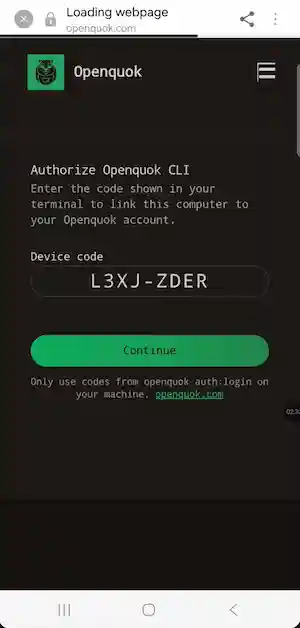
Alternatively, it equals to run following in terminal:
Run:
openquok auth:loginRemote / SSH / CI use (no local browser launch)
OAuth2 device flow always needs a browser somewhere to complete authorization — it doesn’t have to be on the CLI’s machine. The CLI’s job is just to print the verification URL and poll until you authorize it.
Interactive auth:login always prints the verification URL and user code, then tries to open a browser on the CLI’s machine. If open() fails, the CLI re-prints the URL so you can open it manually.
For SSH, CI, or any flow where you don’t want the CLI to call open(), use auth:login --json: the first JSON object on stdout includes verification_uri and verification_uri_complete, and the CLI never launches a browser. Open the link in any browser (your laptop, phone, etc.) to complete authorization — the CLI keeps polling until you do.
For fully unattended auth with no browser at all, use a programmatic token instead — see Programmatic token below.
Machine-readable output (--json)
For scripts, CI, or automation, emit the full device payload and polling result as JSON:
openquok auth:login --jsonThis prints an initial JSON object (including device_code, user_code, verification_uri, verification_uri_complete, expires_in, and interval), then polls until completion and prints a second JSON object when credentials are stored—similar to the historical CLI behavior.
Other auth commands:
openquok auth:status
openquok auth:logout
Which auth server does the CLI use?
The CLI talks to the device-flow API at:
- https://cli-auth.openquok.com (default OPENQUOK_AUTH_SERVER)
That origin serves POST /device/code and POST /device/token. The browser step uses a different URL returned in verification_uri:
- Hosted OpenQuok: https://www.openquok.com/cli/device/verify
You can point the CLI API at your own deployed auth server (self-hosted OpenQuok or local development of agent/server):
- Environment variable: set OPENQUOK_AUTH_SERVER to the server API origin (no trailing slash).
- Per run: pass --authServer to openquok auth:login.
export OPENQUOK_AUTH_SERVER="https://auth.example.com"
openquok auth:login
openquok auth:login --authServer "https://auth.example.com"For local auth server development, the default API URL is http://localhost:3111. With only the auth server running (no web proxy), the browser opens http://localhost:3111/device/verify. To test the production-style split locally, run the web dev server, set BROWSER_ORIGIN on the auth server, and set CLI_AUTH_SERVER_URL on web — see Development environment and Configuration - Agent.
Deploy your auth server
Environment variables for running the auth server, OAuth client keys and the web app are documented under Configuration - Agent and Configuration - Web
Programmatic token
Rotate a workspace programmatic token from Account → Settings → Developers → Access. The plaintext opo_ value is shown once after Generate / Rotate token.
Set it for non-interactive use:
export OPENQUOK_API_KEY="opo_..."
export OPENQUOK_API_URL="https://api.openquok.com"
Add exports to your shell profile if you want them to persist.
You can also store a token once (storage behavior is described in agent/README.md):
openquok auth:login --apiKey "opo_your_programmatic_token"Environment variables
These variables apply to the CLI process (your shell, CI job, or agent), not to the auth server deployment.
| Variable | Required | Default | Description |
|---|---|---|---|
| OPENQUOK_API_KEY | No* | — | Bearer opo_ programmatic token for the public API |
| OPENQUOK_API_URL | No | https://api.openquok.com | API origin; requests use paths under /api/v1/ |
| OPENQUOK_AUTH_SERVER | No | https://cli-auth.openquok.com | API origin for device flow (/device/code, /device/token). Browser URLs come from the server’s verification_uri. Use http://localhost:3111 when running agent/server locally. |
*Either OPENQUOK_API_KEY or successful openquok auth:login (stored credentials) is required for authenticated commands.
Switching between production and local / self-hosted
The CLI resolves two origins for every run:
- API — OPENQUOK_API_URL, then (if unset) apiUrl from ~/.openquok/credentials.json after device login, then the hosted default https://api.openquok.com.
- Device-flow API — OPENQUOK_AUTH_SERVER only; if unset, the default is https://cli-auth.openquok.com.
Use openquok config:show to print the resolved URLs, whether you match hosted OpenQuok (openquok_cloud) or a custom setup, and whether each value came from environment, credentials_file, or default.
Back to hosted OpenQuok (production defaults)
- In the current shell, clear overrides you set for local development:
unset OPENQUOK_AUTH_SERVER unset OPENQUOK_API_URL - If you added the same export lines to ~/.zshrc, ~/.bashrc, or similar, remove or comment them so new terminals also get defaults.
- Run openquok config:show — you should see the hosted API and auth origins and deployment: openquok_cloud.
- If you still use OAuth stored credentials from a local stack, run openquok auth:logout and openquok auth:login again without --authServer and without OPENQUOK_AUTH_SERVER set, so the token and stored apiUrl match production.
Note
openquok auth:logout deletes ~/.openquok/credentials.json only. It does not unset OPENQUOK_AUTH_SERVER or OPENQUOK_API_URL.
Point the CLI at local or self-hosted again
Set the same variables (and optionally pass --authServer on auth:login for a one-off):
export OPENQUOK_AUTH_SERVER="http://localhost:3111"
export OPENQUOK_API_URL="http://localhost:3000"
openquok auth:login
After device login, the CLI may persist apiUrl in credentials.json; OPENQUOK_API_URL still wins when set. Confirm with openquok config:show.
Self-hosting the auth server
You do not need to self-host the auth server to use the CLI with OpenQuok’s hosted stack — the defaults above are enough.
If you run your own OpenQuok deployment and want a dedicated device-flow service:
- Deploy agent/server and set SERVER_URL to your API host.
- Set BROWSER_ORIGIN to your web origin (or omit it to serve browser steps on the same host as the API).
- Deploy web with CLI_AUTH_SERVER_URL when using split hosts.
- Register the OAuth callback on your OAuth app — BROWSER_ORIGIN/cli/device/callback when split, or SERVER_URL/device/callback on a single host.
- Set OPENQUOK_AUTH_SERVER in the CLI to your API origin.
Clone the repository
The auth server lives at agent/server in the openquok-monorepo repository:
git clone https://github.com/Ratimon/openquok-monorepo.git
cd openquok-monorepo
Next, configure environment variables (DATABASE_URL, OPENQUOK_OAUTH_CLIENT_ID, OPENQUOK_OAUTH_CLIENT_SECRET, SERVER_URL, BROWSER_ORIGIN) and register the OAuth callback — see Configuration - Agent for the full reference.
Deployment
Deploy anywhere that runs Node.js and can reach a Postgres database — Vercel, Railway, Render, a VPS, or your own infrastructure.
All device-flow state lives in Postgres, so the process itself holds no state and scales horizontally. Put multiple replicas behind a load balancer when you need more throughput — see Scaling & Postgres.
For Vercel (the path with the most tooling in this monorepo), use two projects when mirroring OpenQuok production:
# Auth server API (agent/server)
pnpm vercel:env:sync:agent-server:prod
pnpm vercel:deploy:agent-server:prod

# Web browser routes (/cli/device/*)
pnpm vercel:env:sync:web:prod
pnpm vercel:deploy:web:prod
Or:
pnpm vercel:deploy:cli-device-flow:prod