OpenClaw
Install the openquok-core skill and OpenQuok CLI on an OpenClaw host (eg. Telegram).
Connect your agent today
Draft from chat, review in your calendar, and publish only what you approve.
Prerequisites
- Node.js 20.19+ (or 22.12+, or 23+) inside the container or host where OpenClaw runs bash.
- Shell access in the workspace directory.
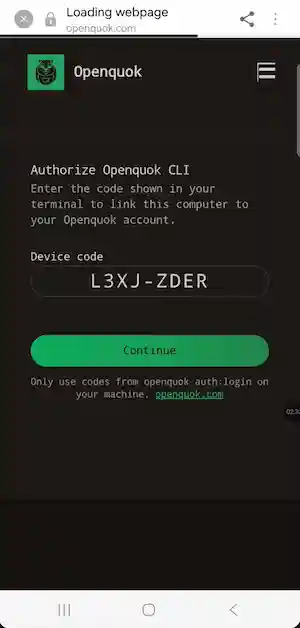
- For OAuth device login: you can authorize the sign-in link on your phone when the agent asks you to log in.
Installation
Open the OpenClaw workspace
Skills installed with project scope are written relative to the current directory. On typical OpenClaw Docker setups, that is the mounted workspace:
cd /data/workspaceIf your deployment uses a different mount path, use the directory where OpenClaw stores project files and where you want .agents/skills/ to live.
Install the openquok-core skill
The skill file lives at agent/skills/openquok-core/SKILL.md in the monorepo. Choose one install path from your OpenClaw workspace (e.g. cd /data/workspace on Docker/Railway):
You should see ./.agents/skills/openquok-core (npx) or ./skills/openquok-core (ClawHub).
Install or upgrade the global CLI
In the same environment (same container shell the agent uses):
npm install -g @openquok/auto-cli@latest
openquok --version
Production auth uses the API at https://cli-auth.openquok.com and opens the browser on https://www.openquok.com/cli/device/verify.
CLI version update
Installing a skill or restarting OpenClaw does not change openquok --version. You need to update it yourself by running npm install -g @openquok/auto-cli@latest
Authenticate
Recommended: ask the agent in chat to log in to OpenQuok. It sends you a sign-in link; open it on your phone, sign in if needed, and tap Authorize.
Alternative for fully headless hosts: rotate a programmatic token from the OpenQuok dashboard (Account → Settings → Developers → Access):
export OPENQUOK_API_KEY=opo_your_programmatic_token
openquok auth:status
Confirm the agent can run commands
From the workspace (after auth):
openquok integrations:listHost OpenClaw on Railway
You can run the OpenClaw Gateway on Railway with a one-click template.
After deploy, use Railway’s shell (or the Control UI at /openclaw) to run the install steps below.
Typical Railway settings from the Railway install guide:
- Attach a volume at /data (persists config and workspace across redeploys).
- Set OPENCLAW_WORKSPACE_DIR=/data/workspace so the project workspace matches the path used in this guide.
- Enable HTTP Proxy on port 8080 and set OPENCLAW_GATEWAY_PORT=8080 (see OpenClaw docs for OPENCLAW_GATEWAY_TOKEN and other variables).
Then open a shell in the Railway service, cd /data/workspace, and continue with Installation.
OpenClaw + Telegram notes
- Start a new chat session after installing the skill or upgrading the CLI so the agent reloads instructions and checks openquok --version once at session start.
- If the agent reports an old CLI version after you upgraded, run command -v openquok and which -a openquok — another binary may be earlier on PATH.
- For posting with images in chat, the user must provide a file or a direct
https://image URL for upload-from-url; ask before calling posts:create with media.
Real World Use case: Chat model vs image generation
OpenClaw uses two separate systems:
| Role | Configured via | Example |
|---|---|---|
| Main chat (Telegram, Control UI, scheduling) | agents.defaults.model.primary in gateway config (openclaw.json) or /model in chat | anthropic/claude-sonnet-4-6 |
| Image generation (on demand) | agents.defaults.imageGenerationModel plus provider API keys | openai/gpt-image-2 via the image_generate tool |
Do not set an image-only model (for example google/gemini-3-pro-image-preview or openrouter/google/gemini-3-pro-image-preview) as your main Telegram or session model. Those models are built for image output, not general chat — the gateway may fail before it can run tools or answer questions.
Warning
Pick a capable chat model for agents.defaults.model.primary (for example anthropic/claude-sonnet-4-6). Configure image generation separately under imageGenerationModel — the agent calls image_generate when the user asks for a picture, without changing the main model. Image jobs run in the background; OpenClaw wakes the agent when the provider finishes.
Set the main chat model
Fastest path on a fresh host:
openclaw onboardOr reconfigure models only:
openclaw configure --section modelPick a chat model such as anthropic/claude-sonnet-4-6. You can also set the default from the shell:
openclaw models set anthropic/claude-sonnet-4-6
openclaw models status
OpenClaw writes the result to gateway config (typically openclaw.json under your OpenClaw data directory):
{
  agents: {
    defaults: {
      model: { primary: "anthropic/claude-sonnet-4-6" },
    },
  },
}
In an existing Telegram or Control UI session, switch with /model anthropic/claude-sonnet-4-6 or /model for the numbered picker. Use /model default to return to the configured primary.
See Models for fallbacks, allowlists, and provider auth.
Configure image generation
Image generation is not part of the OpenQuok skill. Set it up once on the OpenClaw gateway host:
- Add an API key for at least one image provider — for example OPENAI_API_KEY, GEMINI_API_KEY, FAL_KEY, or OPENROUTER_API_KEY (OpenAI Codex OAuth also works for openai/gpt-image-2).
- Optionally set a default image model so image_generate does not rely on auto-detection alone.
openclaw config set agents.defaults.imageGenerationModel '{"primary":"openai/gpt-image-2","timeoutMs":180000}' --strict-json --mergeExample gateway config with fallbacks:
{
  agents: {
    defaults: {
      imageGenerationModel: {
        primary: "openai/gpt-image-2",
        timeoutMs: 180_000,
        fallbacks: [
          "openrouter/google/gemini-3.1-flash-image-preview",
          "google/gemini-3.1-flash-image-preview",
          "fal/fal-ai/flux/dev",
        ],
      },
    },
  },
}
Common routes (see the OpenClaw image generation guide for the full provider table):
| Goal | Model ref | Auth |
|---|---|---|
| OpenAI image generation | openai/gpt-image-2 | OPENAI_API_KEY or OpenAI Codex OAuth |
| Google Gemini images | google/gemini-3.1-flash-image-preview | GEMINI_API_KEY |
| fal (Flux, Krea, Nano Banana) | fal/fal-ai/flux/dev | FAL_KEY |
| OpenRouter image models | openrouter/google/gemini-3.1-flash-image-preview | OPENROUTER_API_KEY |
The image_generate tool appears only when at least one image provider is available. Inspect registered providers at runtime with /tool image_generate action=list.
Then ask in Telegram or the Control UI:
Generate a square image of a product hero shot on a clean white background
OpenClaw routes that to image_generate using imageGenerationModel.primary (or the next fallback) — your main chat model stays on Sonnet.
Full model list, editing, aspect ratios, and provider deep dives: OpenClaw image generation.
Troubleshooting
Invalid or expired code
The user must open the exact verification_uri_complete link from auth:login --json while the CLI is still polling. Codes expire in about 15 minutes. Pre-login at openquok.com alone does not validate the device code.
Warning
If Telegram chat fails while the Control UI works, the gateway may be on an image-only model (for example google/gemini-3-pro-image-preview). Run openclaw models set anthropic/claude-sonnet-4-6 or /model in chat and pick a chat model. Use imageGenerationModel for pictures — see Chat model vs image generation above.