Grok Bot
Install the openquok-core skill and OpenQuok CLI on a Grok Bot cloud computer (desktop and iOS).
Connect your agent today
Draft from chat, review in your calendar, and publish only what you approve.
Prerequisites
- An eligible plan such as SuperGrok Heavy, Cursor Ultra, or Cursor Teams Premium — sign in with your Cursor account when you install Grok Bot.
- The Grok Bot desktop app (macOS or Windows) or iOS app, with at least one Bot created.
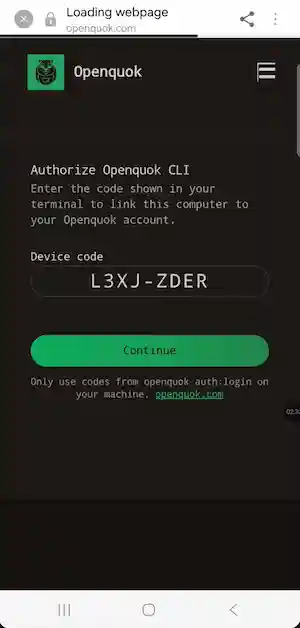
- For OAuth device login: you can authorize the sign-in link on your phone when the Bot asks you to log in.
Installation
Install Grok Bot
Download the desktop client for macOS or Windows, or install on iOS. Create a Bot teammate — each Bot gets a shared persistent cloud computer (browser, filesystem, terminal).
Official product and setup docs: Grok Bot and the get started guide.
Install the global OpenQuok CLI
Ask your Bot to run this on its cloud computer (the same shell environment it uses for terminal tools):
npm install -g @openquok/auto-cli@latest
openquok --version
Production auth uses the API at https://cli-auth.openquok.com and opens the browser on https://www.openquok.com/cli/device/verify.
CLI version update
Installing a skill or starting a new chat does not change openquok --version. Ask the Bot to run npm install -g @openquok/auto-cli@latest on its computer when you need a newer CLI.
Install the openquok-core skill
The skill file lives at agent/skills/openquok-core/SKILL.md in the monorepo. Grok Bot loads skills from Settings → Plugins or when you invoke / in chat. Choose one install path:
Start a new chat after install so the Bot reloads skill instructions.
Authenticate
Recommended: ask the Bot to log in to OpenQuok. It runs device OAuth on its cloud computer; open the link on your phone, sign in if needed, and tap Authorize.
Alternative for headless or scripted runs: rotate a programmatic token from the OpenQuok dashboard (Account → Settings → Developers → Access):
export OPENQUOK_API_KEY=opo_your_programmatic_token
openquok auth:status
Credentials are stored on the Bot shared computer — not in your desktop chat history.
Confirm the Bot can run commands
After auth, ask your Bot to run:
openquok integrations:listVerify in chat
Ask your Bot something like:
List my connected channels, then draft a TikTok post for tomorrow at 10am — do not publish until I approve on OpenQuok.
Posts should land as drafts or scheduled items in your OpenQuok workspace. Review on the calendar or kanban before anything goes live.
Grok Bot + OpenQuok notes
- CLI-first: openquok-core teaches shell commands on the shared computer. Optional Connectors/MCP are a secondary path — prefer the skill for scheduling workflows.
- Shared computer: OPENQUOK_API_KEY and ~/.openquok/credentials.json live on the Bot environment. Do not paste tokens into chat.
- Plugins vs MCP: save openquok-core under Settings → Plugins; invoke with / when you need scheduling. Connectors are optional for other tools.
- Human approval: the Bot can queue volume; you approve quality on OpenQuok before publish.
Troubleshooting
Outdated skill or CLI
Updating the skill does not upgrade openquok --version. Ask the Bot to run npm install -g @openquok/auto-cli@latest on its computer, then start a new chat so the OpenQuok skill re-runs its opening checks.
Skill not found
Confirm /workspace/openquok-core/SKILL.md exists or that openquok-core appears under Settings → Plugins. Re-save the skill from the curl path above if needed.
Plan eligibility
Grok Bot requires an eligible subscription (for example SuperGrok Heavy, Cursor Ultra, or Cursor Teams Premium). OpenQuok billing is separate — you still need a workspace and connected channels in the OpenQuok app.